HOOTIO / PRACTICAL USER GUIDE
Hootio Smart Import User Guide
Import camera cards, organize media by shooting day, and keep a separate backup.
Guide date: 9 October 2026. The screenshots show an earlier Hootio 1.0.29 interface; the steps reflect the current Hootio, PhotoBot and VideoBot source. Check the labels in your installed version.
About the illustrations: The screenshots use the application's actual Avalonia controls with demonstration accounts, devices, paths and results. They explain the interface; they are not evidence of an import from a real camera card. Example drive letters and media names are fictional. No personal account data is required to follow the guide.
1. Features and where to find them
| Task | Control or area | What it does |
|---|---|---|
| Sign in | Sign in with Hootio | Opens the system browser for account sign-in |
| Choose destinations | Top-right gear → Workspace Settings | Sets separate photo and video workspaces, plus optional backups |
| Change language | Workspace Settings → Interface Language | Selects English or Simplified Chinese |
| Find connected cards | FIND CARD | Refreshes the removable-storage list |
| Select several cards | Removable Storage list | Lets a single import use several selected devices |
| Organize and copy | SMART IMPORT | Reads supported media and assigns destination folders by shooting day |
| Choose folder names | Workspace Settings → Folder naming | Offers six formats and an optional project or event name |
| Inspect results | SUMMARY & DETAIL | Shows media totals, destination groups and copy statuses |
| Open a location | Folder icon | Opens the corresponding source, workspace, backup or result folder |
| Stop an operation | STOP | Requests cancellation of the active import or backup check |
| Compare a backup | CHECK BACKUP | Compares supported media in configured workspace/backup pairs |
| Start follow-up work | VIDEOBOT CONNECT | Requests proxy creation or Smart Edit in VideoBot |
| Prepare photos for Lightroom | PHOTOBOT CONNECT | Creates or updates a catalog; PhotoBot can adjust a copy and build previews |
Smart Import copies source files; it does not provide a card-formatting or card-erasing command. Keep the source card until you have checked the delivered files and your required second copy.
| Workflow | Set up before pressing SMART IMPORT | Completion to verify |
|---|---|---|
| Import only: Hootio Smart Import | Set both workspaces, folder naming and any separate backup folders. Turn off Create / update catalog, Smart Develop, Build previews, Create proxy and Create Smart Edit. Select the intended cards | Import results show the expected copied or existing media with no unresolved failures; inspect sample files and any configured backup, run CHECK BACKUP when available, and keep cards until the required second copy is verified |
| Photos: Hootio → PhotoBot → Lightroom Classic | Set both workspaces; turn off Lightroom's card-import prompt and catalog picker; select an .xmp preset or intentionally choose None; install and enable HootioPhotoBot.lrplugin and select Check again in PhotoBot; enable Create / update catalog, Smart Develop, and previews if wanted; turn off VideoBot options for a photo-only run | Hootio copy and catalog tasks finish; PhotoBot's adjusted -hootio catalog is complete; both preview counts finish if selected; open the catalog in Lightroom and inspect originals and edits |
| Video: Hootio → VideoBot | Set both workspaces; install and sign in to VideoBot, grant access to the Video Workspace; save VideoBot output, proxy and relevant .cube LUT settings; enable Create Smart Edit and optional Create proxy; turn off catalog and PhotoBot options for a video-only run | Hootio finishes copying and sends the request; in VideoBot the project reaches Done. and All preprocessing stages are complete. Check proxy output too if selected |
Import-only is the Hootio path and needs no Lightroom, PhotoBot or VideoBot setup. The photo and video processing paths can run independently after their own first-run setup. A video-only run does not need the PhotoBot plugin; a photo-only run does not need VideoBot. When both follow-ups are selected for the same import, the queue completes photo tasks before it sends the video requests. Complete first-run setup in sections 15 and 17 before expecting a single Smart Import start to finish either processing path.
2. Your first import
1. Connect the reader and card, then open Hootio Smart Import and sign in if requested.
2. Maximize the window so the workspace paths, device list and results are easy to read.
3. Open the top-right gear. Choose both Photo Workspace and Video Workspace. If you need backups, choose Photo Backup and Video Backup separately.
4. Select a folder-naming format, check its preview, then click Save Settings.
5. Click FIND CARD. Select the intended card in REMOVABLE STORAGE and confirm its label, root path and capacity.
6. For an import-only run, turn off Create / update catalog in Workspace Settings and leave PHOTOBOT CONNECT and VIDEOBOT CONNECT options off. These selections may persist from an earlier run. For catalog creation or PhotoBot processing, complete the first-use checklist in section 17 before importing the relevant cards.
7. Click SMART IMPORT. If a large-storage or PhotoBot readiness/credit notice appears, check its details before continuing. Hootio no longer runs a Lightroom launch-and-close test before copying.
8. Wait for the completion status. Check the workspace, backup and related-file summaries, then expand the destination groups.
9. Open the output folders, compare the imported inventory with the source, and open representative photo, video and audio files. If configured, run CHECK BACKUP and review its scope and results as described in section 14.
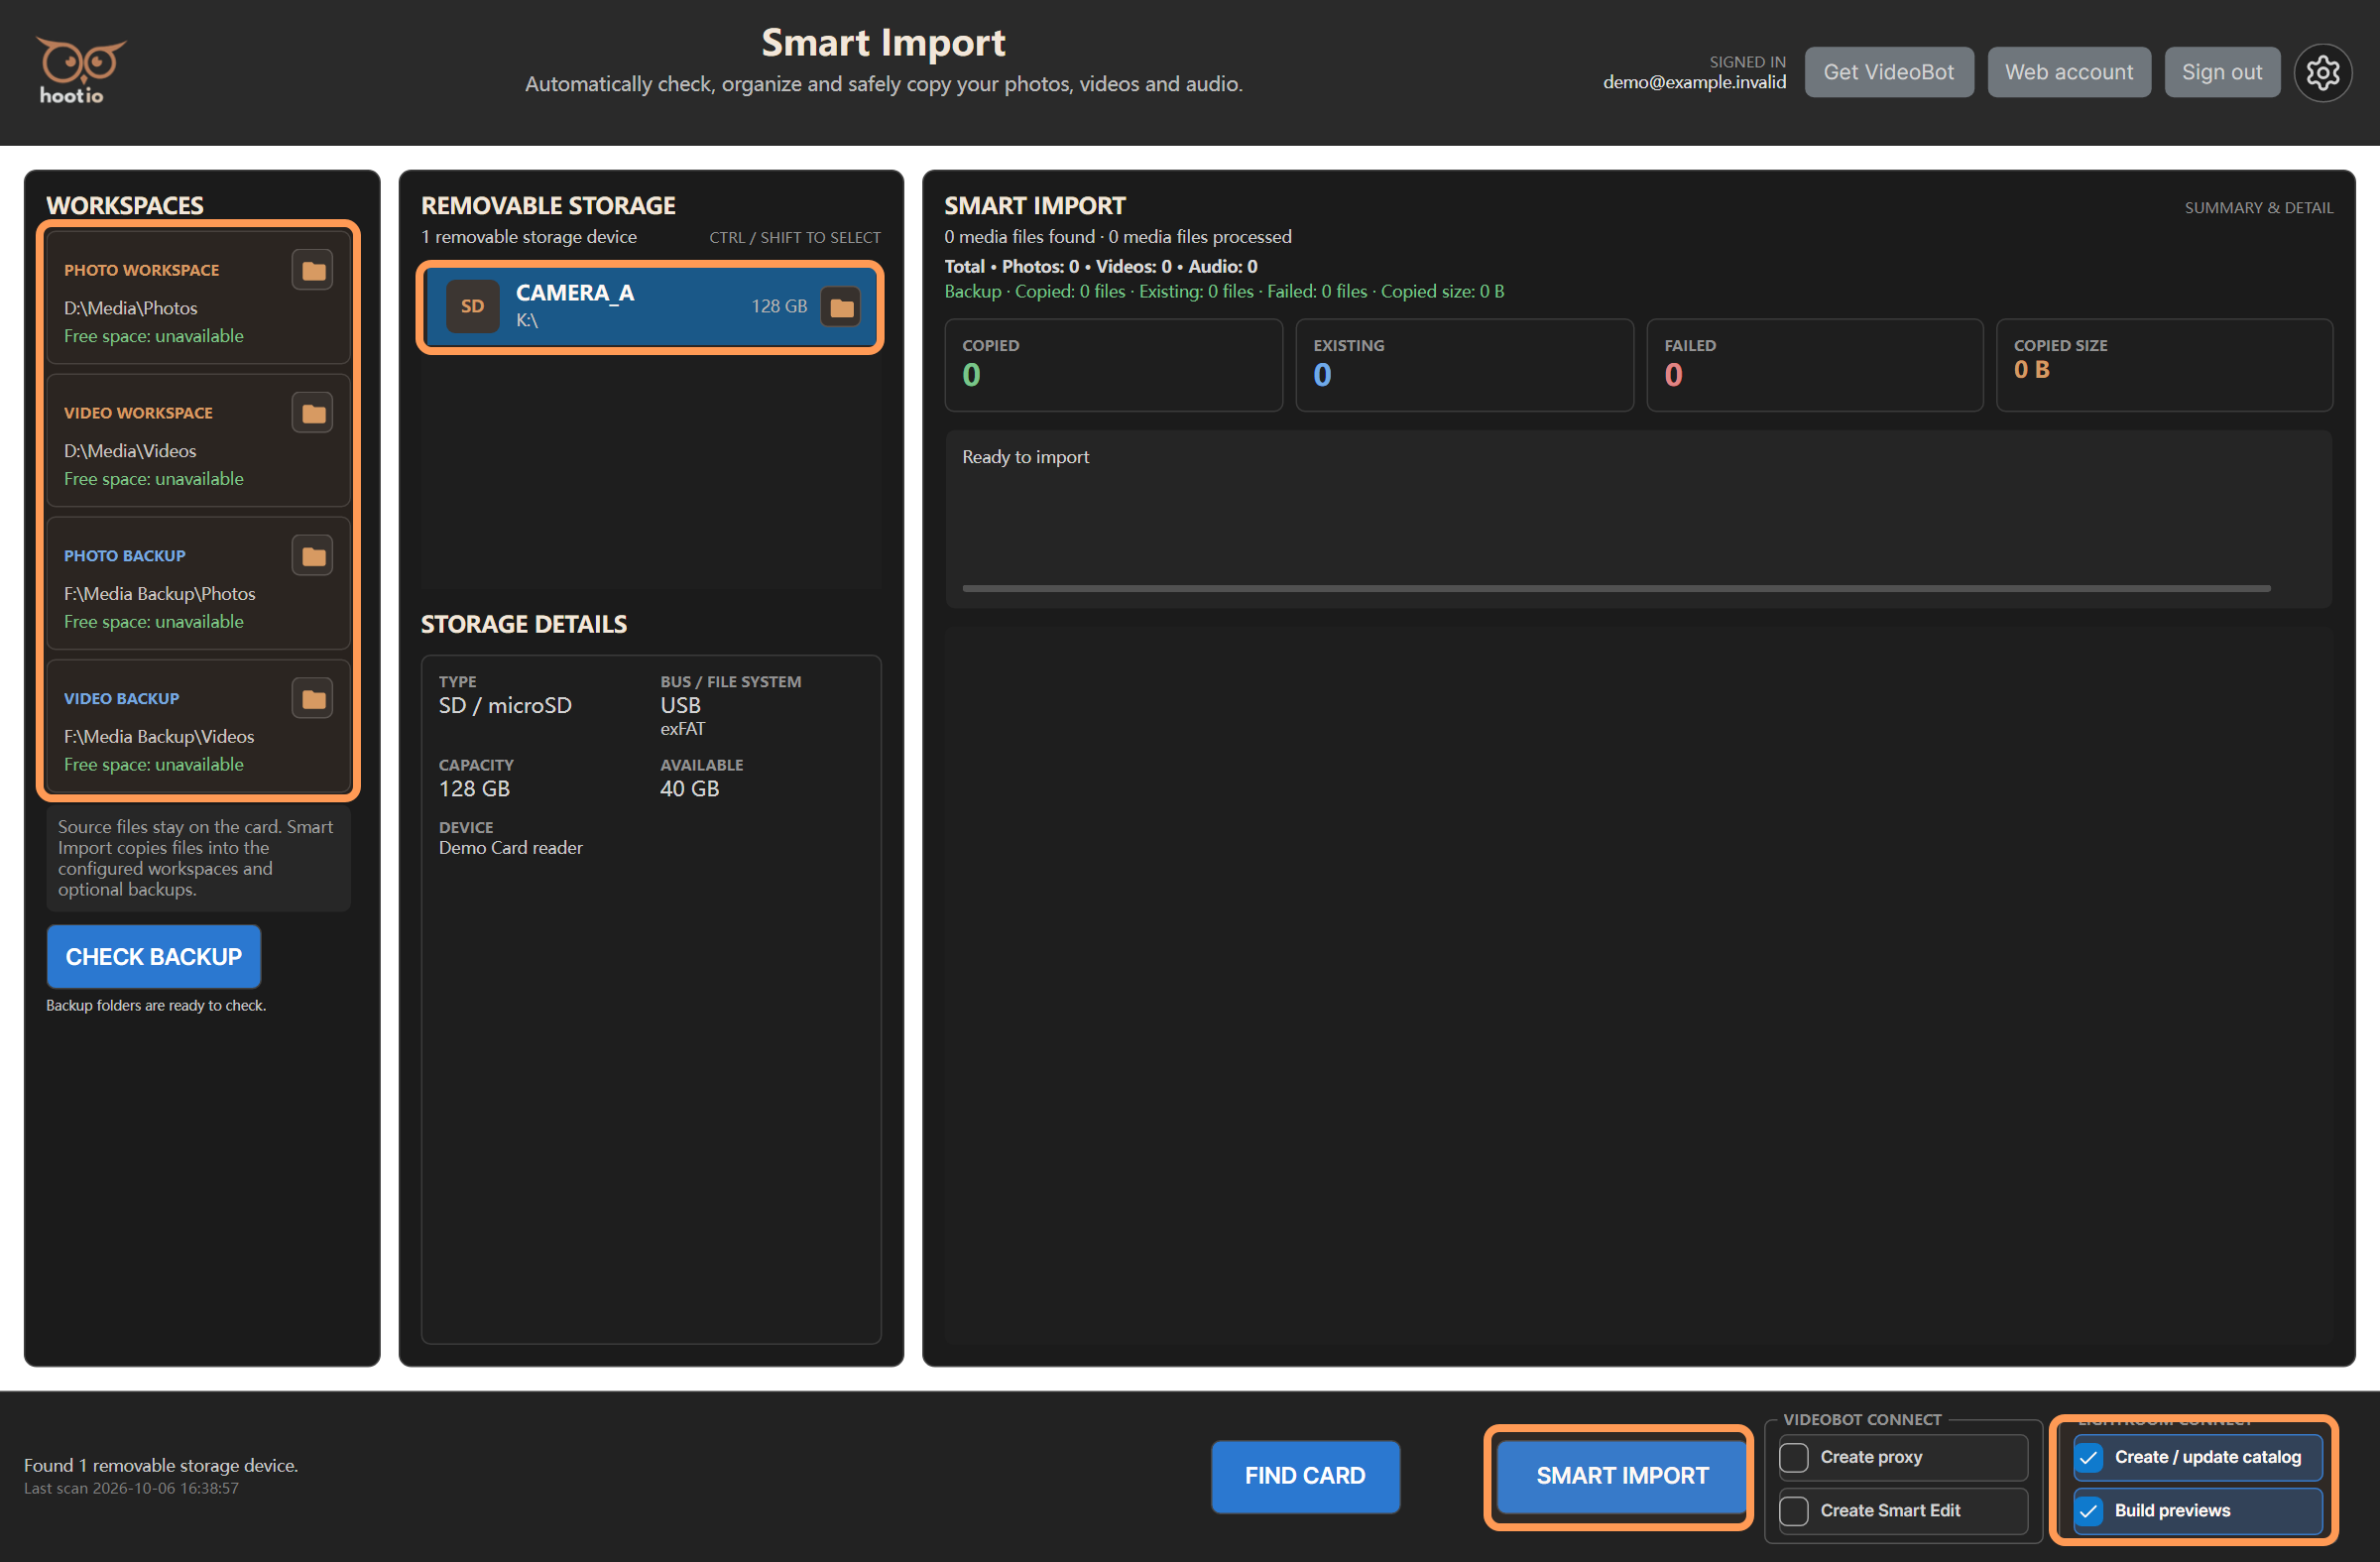
The left column identifies the destinations, the middle column identifies the source devices, and the right column shows the current operation and results. The bottom bar contains the main actions.
3. Sign-in, language and account controls
At the sign-in screen, choose Sign in with Hootio, complete the browser flow, then return to the application. Create a Hootio account opens the registration flow. The application may restore an existing protected session on startup.
If sign-in is cancelled, use Try again. If a session expires or the account has been used on another computer, follow the new sign-in prompt. For an account-linking, disabled-account or version-mismatch message, keep the displayed support code when requesting help.
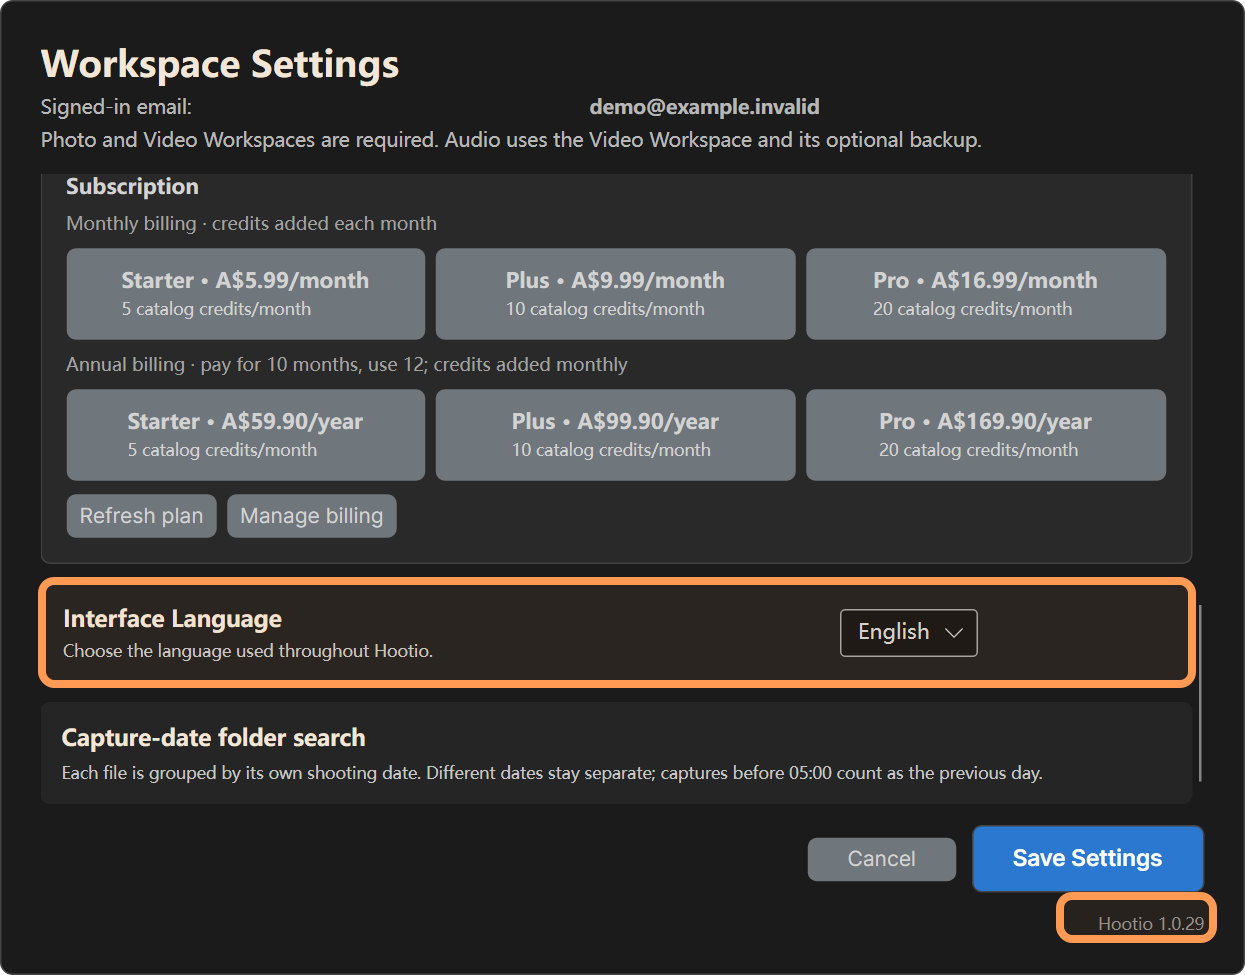
To change language, open the gear, find Interface Language, and choose English or the Simplified Chinese option. The interface updates while you edit; Save Settings keeps the selection. Cancel restores the saved settings, including the language. The main window also provides Sign out and Web account, which opens account management in your browser.
4. Choose four paths deliberately
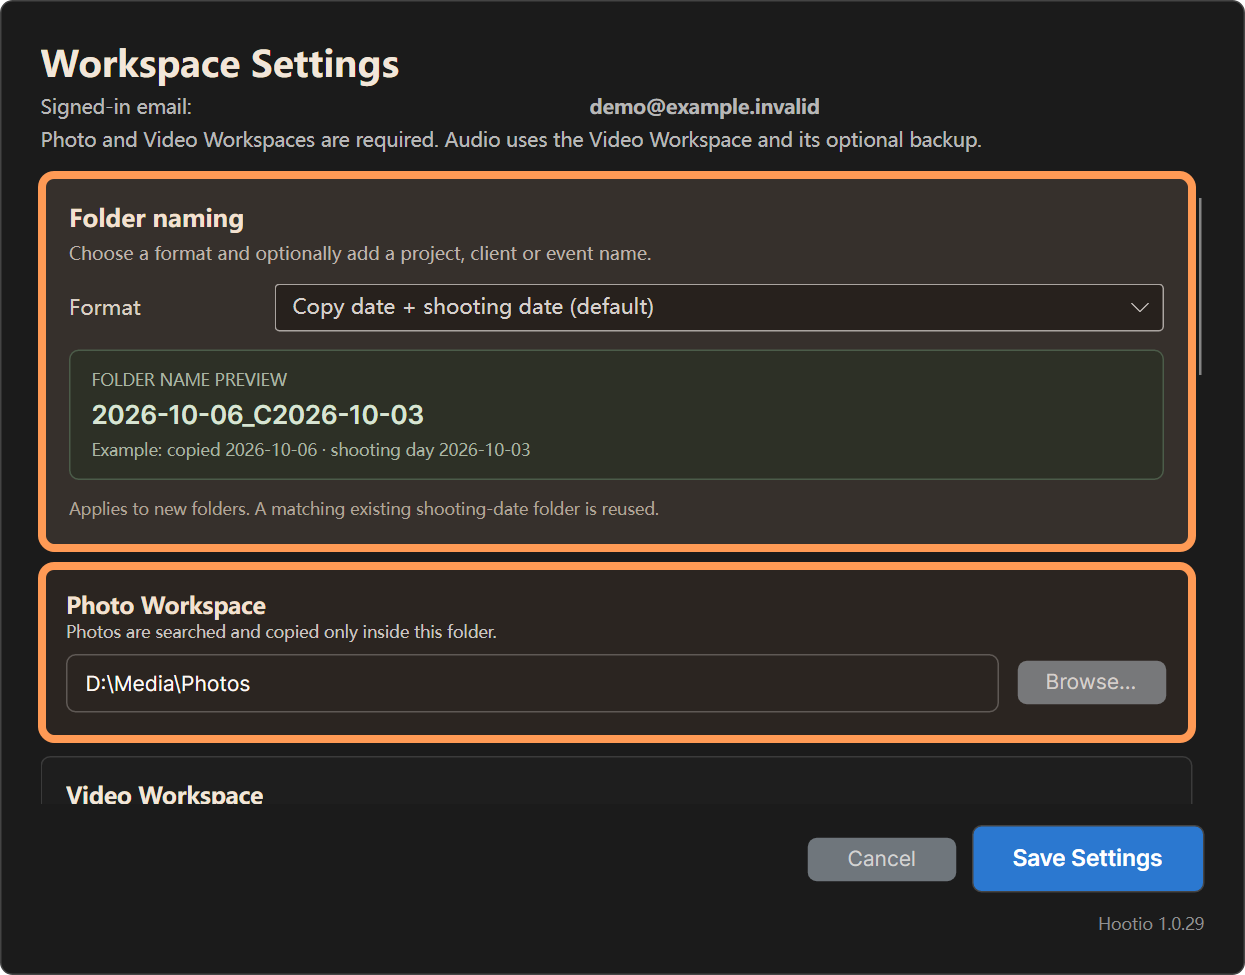
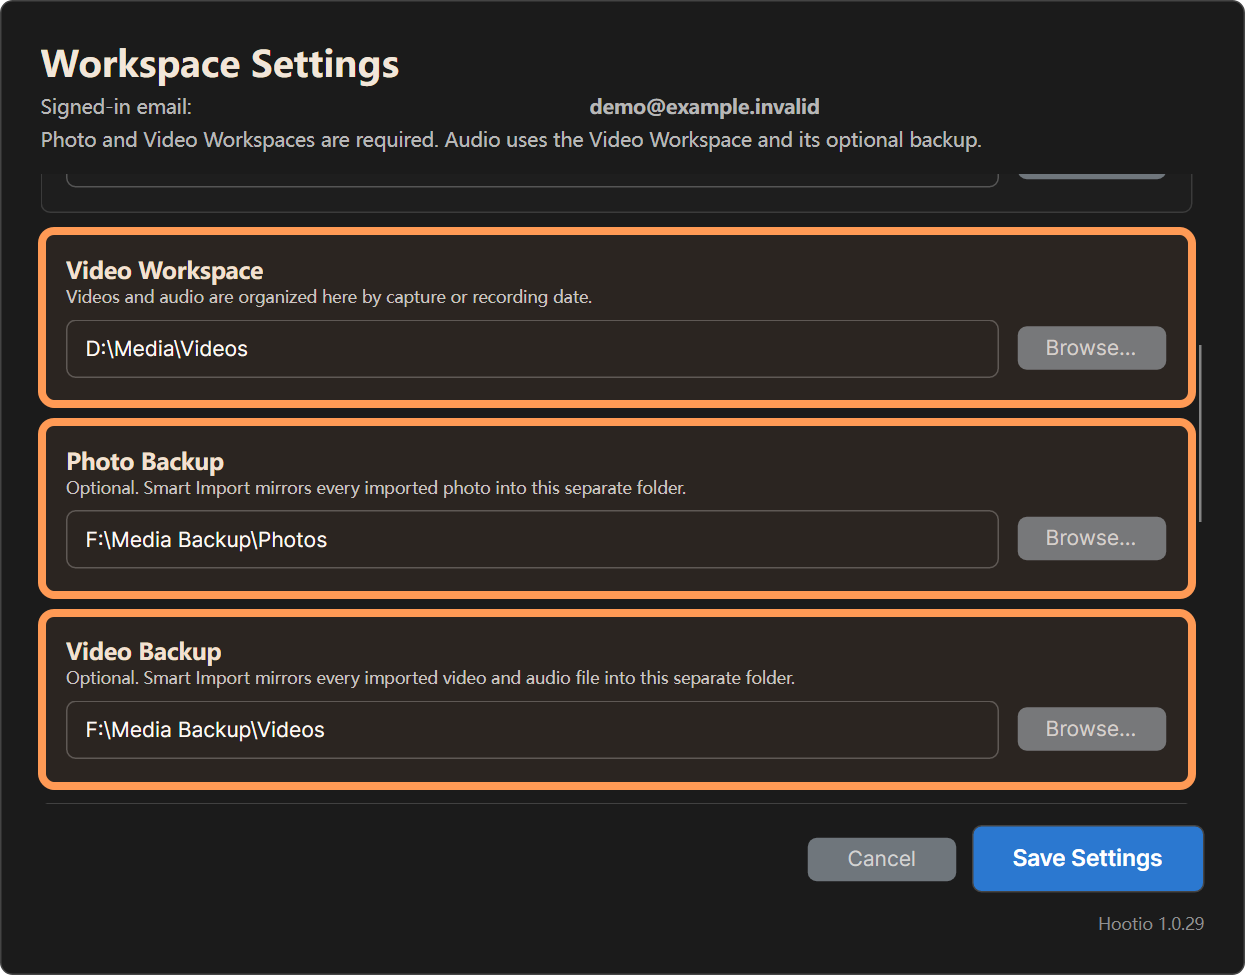
Open Workspace Settings and use the Browse… button beside each destination. The text fields can also hold the intended folder path. Scroll inside the settings panel to reach the remaining destinations and language control.
| Setting | Required? | Example | Contents |
|---|---|---|---|
| Photo Workspace | Yes | D:\Media\Photos | Photos and supported RAW files |
| Video Workspace | Yes | D:\Media\Videos | Video and audio files |
| Photo Backup | Optional | F:\Media Backup\Photos | Separate photo copies |
| Video Backup | Optional | F:\Media Backup\Videos | Separate video and audio copies |
Both workspace fields are required, including for a photo-only or audio-only job. There is no separate Audio Workspace setting. Leave a backup field empty when you do not want that backup.
Choose distinct folders that do not contain one another. For example, do not place a backup inside its workspace. Do not use the source card as a destination. Different folders on the same disk are not independent protection against that disk failing; use another physical drive when that is your backup requirement.
Click Save Settings and check all four destination labels on the dashboard. Their folder icons open the selected locations. To change a destination later, return to settings and save again; changing settings does not relocate earlier imports.
For a network destination, first make sure the location opens in Explorer or Finder. When Hootio displays Network workspace needs attention, use OPEN NETWORK LOCATION, finish the operating-system sign-in, return to Hootio and select RETRY. CHOOSE ANOTHER lets you select a replacement destination.
Lightroom settings
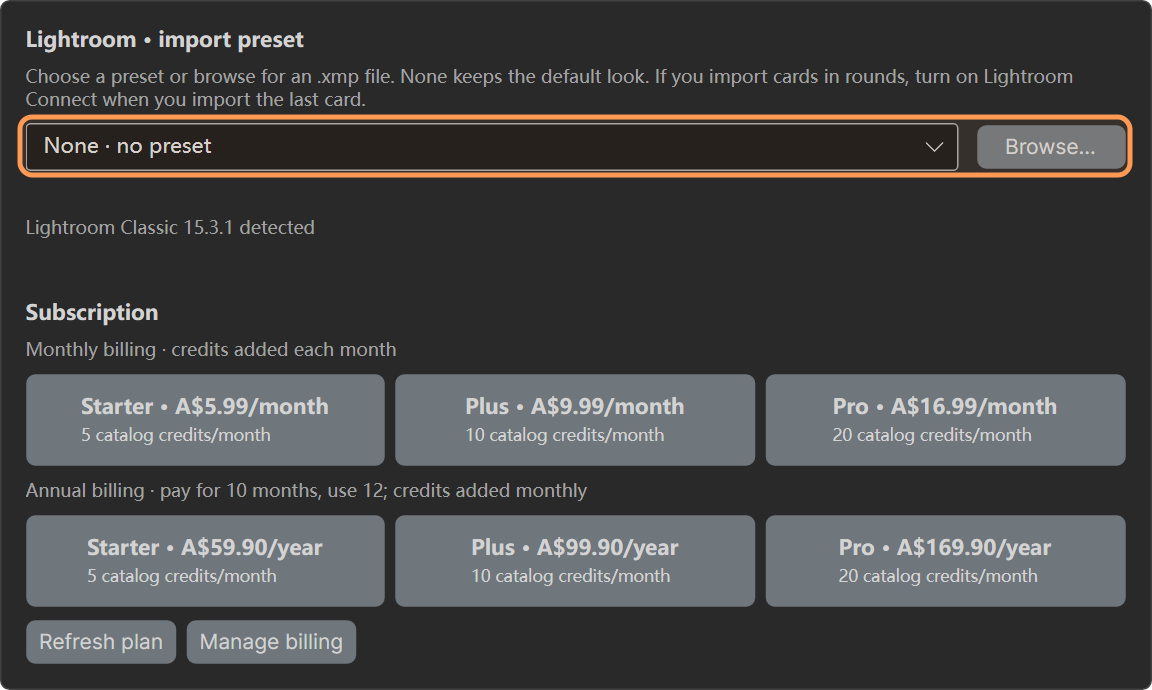
In Settings → Lightroom · import preset, choose the look you want for new catalogs. Select a preset from the list or browse for an .xmp preset. None leaves the photos with their default Lightroom adjustments. Save your choice before the import that will create the catalog. You can still copy cards without choosing a preset or enabling catalog creation.
5. Find cards and select multiple sources
Click FIND CARD after inserting or reconnecting a card. The list shows a device label, root path and capacity. Selecting an entry displays its type, bus/file system, total capacity, available space and device details.
Use Ctrl or Shift, as indicated by the interface, to select multiple devices. Check every highlighted entry before importing. The detail panel describes the current entry; it does not replace checking the other selected devices. The folder icon beside an entry opens that source in the system file manager.
A reader may identify a card as USB removable storage instead of its exact card type. Confirm the root path and contents rather than relying only on the SD/CF label. Storage larger than the application's 512 GB threshold produces an additional selection confirmation.
If a card is missing, check that the operating system can read it, reconnect the reader, and refresh again. The main interface selects detected devices; it does not offer an arbitrary source-folder picker.
6. Supported media and shooting dates
The application recognizes these extensions without regard to letter case:
| Category | Extensions |
|---|---|
| Photos and RAW | JPG, JPEG, HEIC, HEIF, PNG, TIF, TIFF, DNG, BMP, GIF, JXL, CR2, CR3, NEF, NRW, ARW, SR2, ORF, RW2, RAF, PEF, SRW, X3F, RWL, WEBP, AVIF |
| Video | MP4, MOV, M4V, AVI, MTS, M2TS, MPG, MPEG, WMV, MKV, 3GP, 3G2, WEBM, INSV, MXF, VOB, TS, MOD, TOD, OGV, DV |
| Audio | WAV, WAVE, BWF, MP3, M4A, M4B, AAC, FLAC, AIF, AIFF, AIFC, OGG, OGA, OPUS, WMA, CAF, AMR, W64 |
Recognizing an extension does not mean that all date metadata in that format can be read. Smart Import uses supported EXIF or QuickTime dates and otherwise falls back to the source file's last-write time. WAV/BWF recording metadata currently uses that file-time fallback. A file copied or edited earlier can therefore be assigned a date different from its original recording day.
The shooting-day boundary is 05:00. A read capture time before 05:00 belongs to the previous day; 05:00 and later belongs to the displayed calendar day.
| Time read from the file | Shooting-day folder |
|---|---|
| 12 September 2026, 23:50 | 12 September |
| 13 September 2026, 00:04 | 12 September |
| 13 September 2026, 04:59:59 | 12 September |
| 13 September 2026, 05:00 | 13 September |
Check destination dates against the shoot, especially for mixed cameras, overseas recordings and files with changed timestamps. The current settings page describes the 05:00 rule but has no control to change it.
7. The six folder-naming formats
In settings, select Folder naming → Format. Formats that include a name enable Custom text. The preview shows the resulting name before saving.
For an import on 15 September 2026, shooting day 12 September 2026, and custom text Smith Wedding:
| Format | Example folder name |
|---|---|
| Copy date + shooting date (default) | 2026-09-15_C2026-09-12 |
| Shooting date | 2026-09-12 |
| Compact shooting date | 20260912 |
| Shooting date + custom text | 2026-09-12_Smith Wedding |
| Custom text + shooting date | Smith Wedding_C2026-09-12 |
| Copy date + custom text + shooting date | 2026-09-15_Smith Wedding_C2026-09-12 |
Keep custom text within 60 characters. Do not use path separators, <>:"/\|?*, a trailing full stop, or reserved date markers such as C2018-05-19. Resolve any validation message before saving.
Naming settings apply when a new folder is needed. An existing matching shooting-day folder can be reused, including one created with an older naming format. Changing the preset does not rename old folders. If you manage several unrelated projects on the same date, check the resolved destination carefully: the custom label does not by itself isolate those projects from date-based folder reuse.
8. Where photos, videos and audio go
The following example uses the plain Shooting date format for 12 September 2026:
Source card
  DCIM\100CAM\IMG_0001.JPG
  PRIVATE\CLIP\C0001.MP4
  RECORDER\TAKE001.WAV

Photo Workspace
  2026-09-12\IMG_0001.JPG

Video Workspace
  2026-09-12\CLIP\C0001.MP4
  2026-09-12\TAKE001.WAV
Photos go directly into the photo shooting-day folder. Audio goes directly into the video shooting-day folder. New video destinations normally add a child named after the video's immediate source parent folder, such as CLIP; they do not reproduce the card's entire directory tree. A video at the source root uses the fallback child name Videos when creating a new destination.
Existing matching media and date folders can affect the resolved location. Use the actual result-folder path as the authority for that run. Configured backups mirror each resolved relative folder and filename under the corresponding backup root.
9. Start the import and read progress
After selecting sources and saving settings, click SMART IMPORT. Hootio checks destinations and available space, scans supported media, reads dates, resolves folders and copies files. A missing target may prompt you to choose a replacement folder; a network target may require reconnecting before the run can proceed.
During scanning, Found so far is provisional. The source summary separates photos, videos and audio and provides a row for each source device. Later progress describes folder selection, the current file, backup operations and an estimated remaining time.
Keep source and destination drives connected while the operation is active. If the free-space message identifies a shortage, free space or choose another destination, then start again. Existing files still contribute to conservative space estimates, so the displayed required space can exceed the final amount newly copied.
Wait for the final status before reviewing the run. A 100% progress figure means the recorded processing steps finished; check the failed counts and destination contents as well.
10. Repeated imports and filename conflicts
Smart Import tries to reuse existing shooting-day folders and identify media that already exists. A result marked EXISTING or EXISTS means that the application accepted an existing destination under its matching rules.
For primary workspace media, those rules use filename, capture date and size; the status is not a byte-for-byte content guarantee. Two cards can contain different files with the same name and size. Keep the source and check suspected matches with an independent file comparison before treating them as interchangeable.
When a same-name file is treated as different, a copy may receive a suffix such as _001. Inspect both filenames and contents after collisions. Repeating a run can recognize many existing files, but do not assume that every previously renamed collision will remain a single copy.
If a backup already has different content at the required relative path, the application reports a backup failure rather than replacing that backup automatically. Preserve both versions, identify the correct one, and resolve the conflict deliberately.
11. Related files and sidecars
Files that are not recognized as photo, video or audio can be copied as related files when they share a source folder with supported media. Examples include .xmp sidecars and text notes. Related files are reported separately and appear as OTHER in destination groups.
The association is based on the source folder, not a guarantee that each sidecar is paired with its same-stem media file. A folder containing several dates or media kinds can send its related files to more than one destination.
Folders that contain only unrelated documents are not a complete-card archive. If the card contains project files, manifests, databases or other material outside the recognized-media folders, copy those separately. After a filename collision, check any sidecar-to-media naming relationship in the output folder before using it in an editor.
12. Read the result groups
The main totals show COPIED, EXISTING, FAILED and COPIED SIZE for media. Separate lines show backup and related-file results. Check all of them: a successful workspace copy does not establish that its backup succeeded.
Expand a destination group to see the files and their statuses. WORKSPACE and BACKUP badges distinguish the two destinations. Folder headers show category counts and have an Open folder icon. A failure without a resolved destination can appear under No destination (failed).
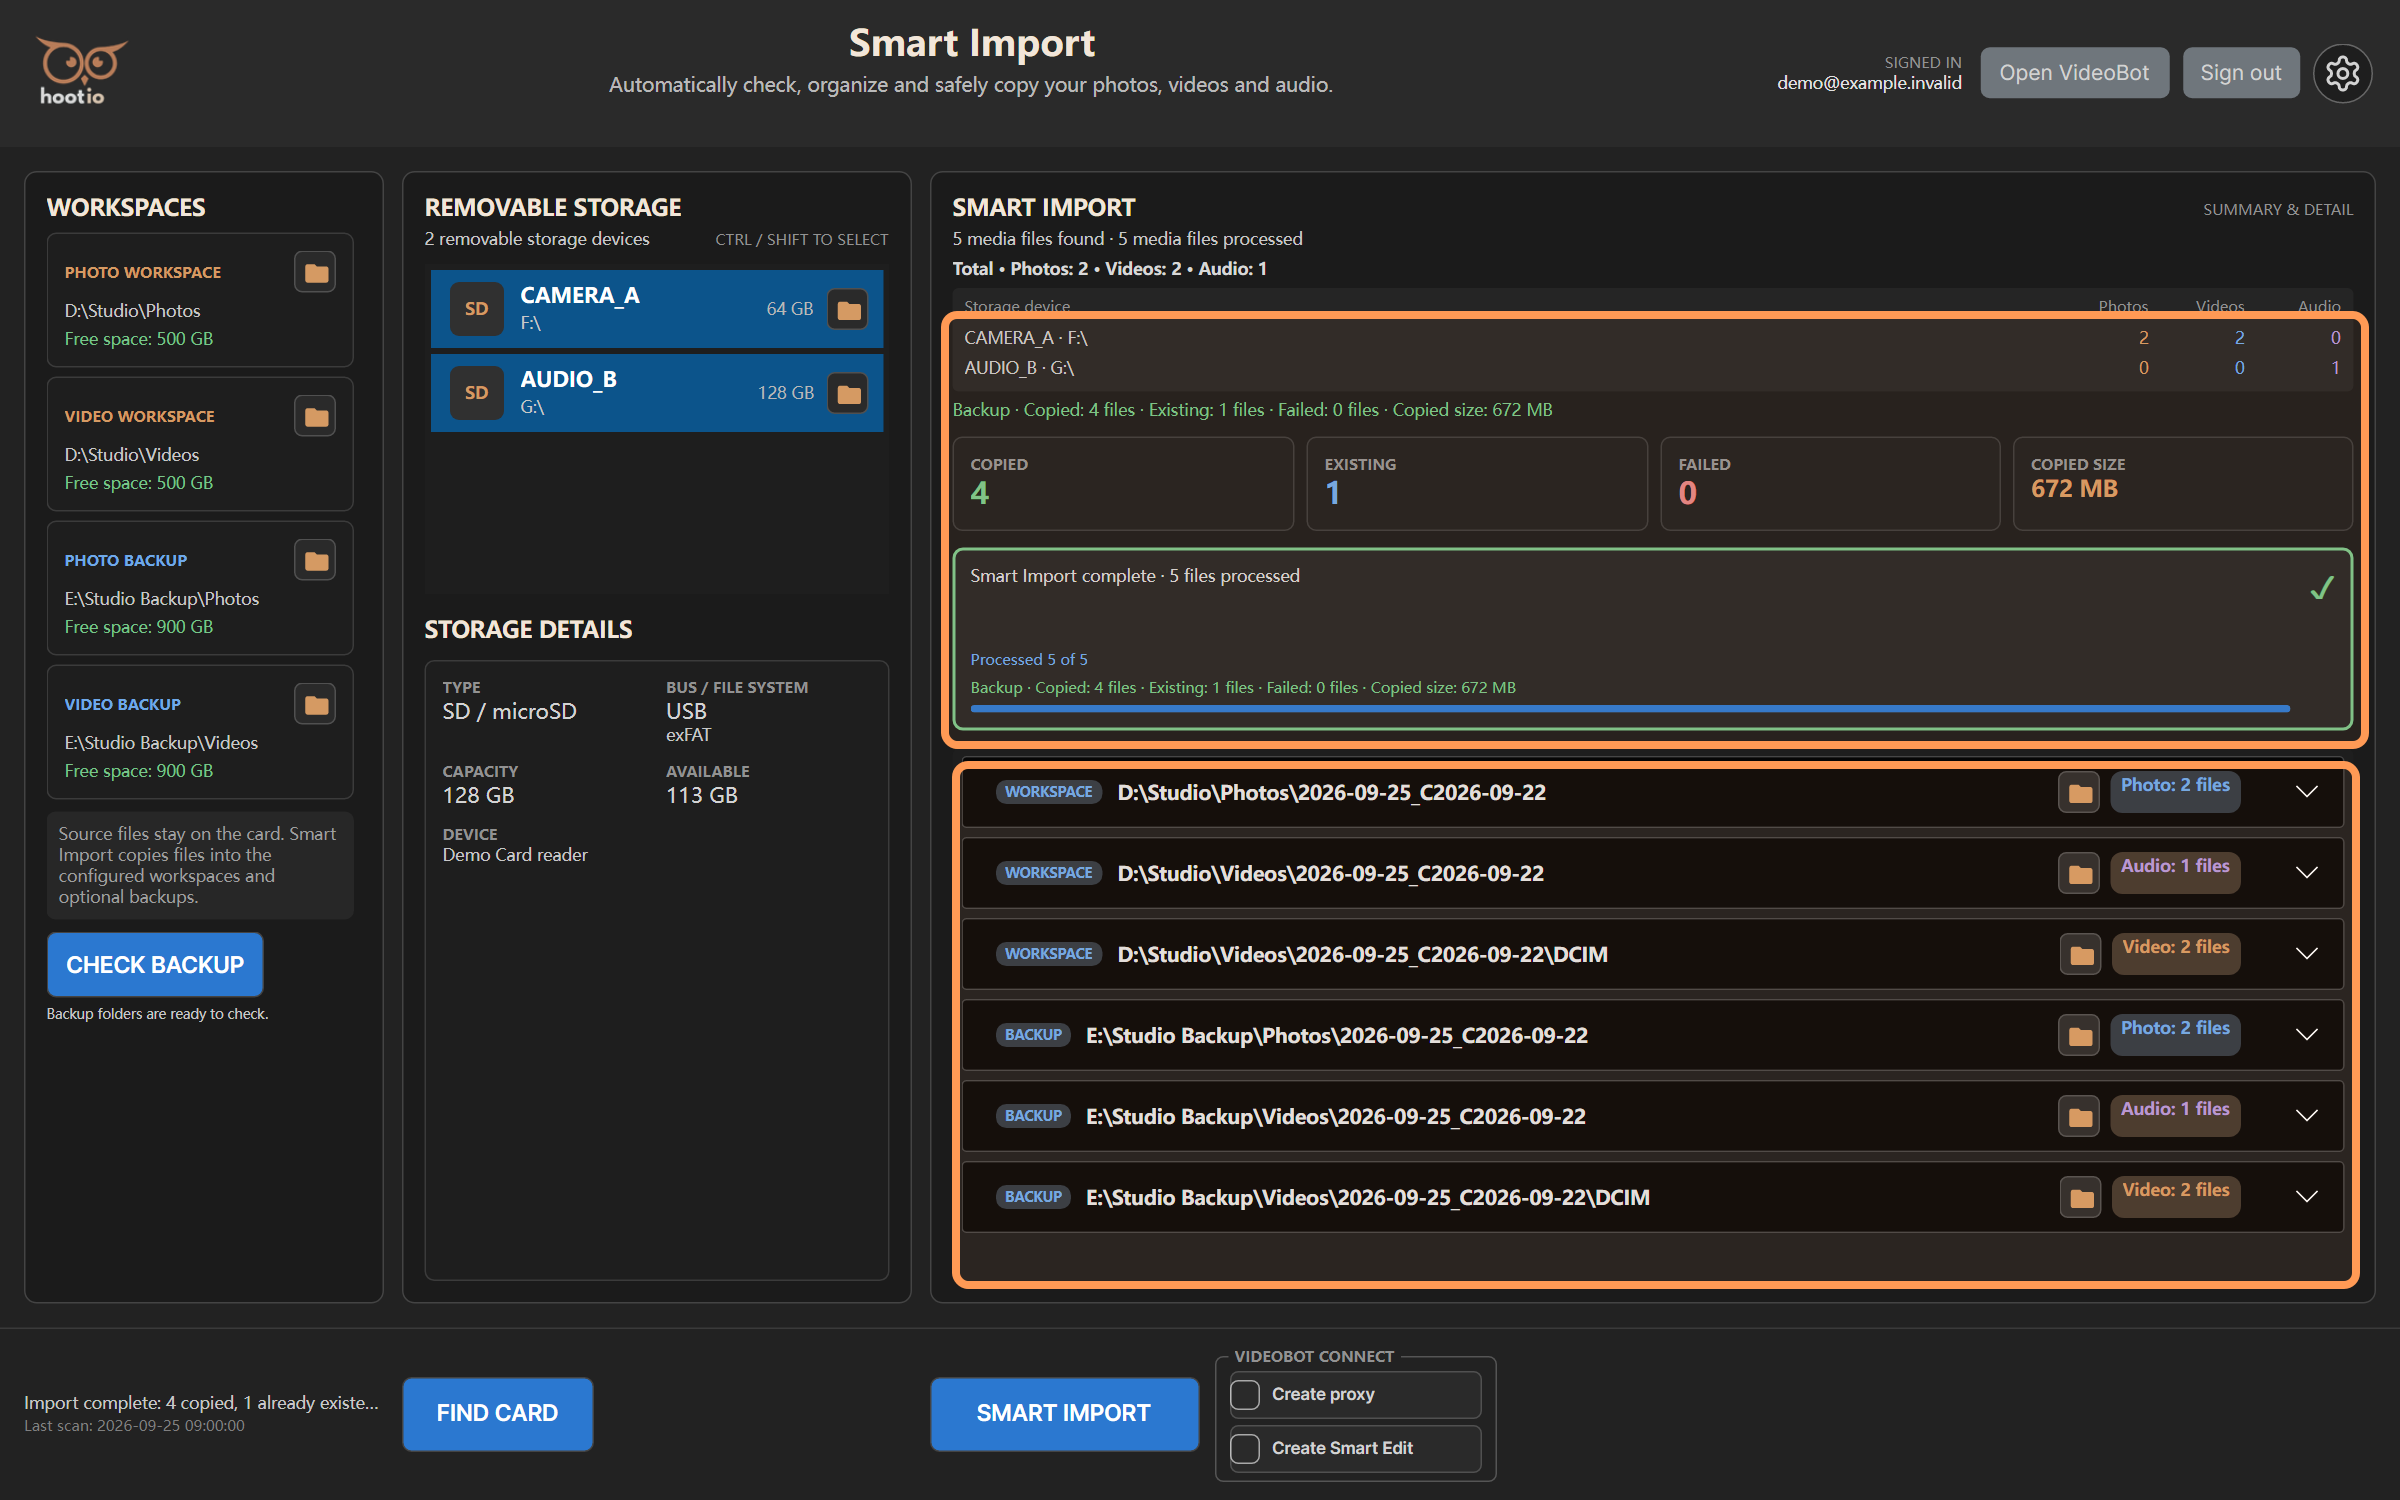
Open each destination you need to inspect. Confirm expected filenames, sizes, date folders and the ability to open media. Compare the source inventory by card and category; the media total does not include every document and sidecar on the card. Record any failed filenames and the source device before retrying.
13. Stop and resume carefully
During an import, click the bottom STOP button once. Hootio changes to a stopping state and requests cancellation. Wait until it reports Smart Import stopped and releases the busy state before disconnecting a drive.
Completed copies are kept. Stopping is not an undo operation, and a cancelled run should not be treated as a completed delivery. The full final result grouping may not be available after cancellation; inspect the folders directly if needed.
To continue, reconnect all required drives, confirm the same destinations, refresh the card list, select the relevant source devices and start SMART IMPORT again. Review existing-file decisions, renamed collisions and missing backups as part of the new run.
The separate STOP control displayed during a backup check cancels that check. A stopped check does not establish that the backup matches.
14. Check the configured backups
CHECK BACKUP appears when at least one backup is configured and is available while the application is idle. It compares the configured workspace and backup roots; it does not need the source card and is not limited to the last import.
1. Confirm that the intended workspace and backup drives are connected and accessible.
2. Click CHECK BACKUP in the left column.
3. Wait for the result dialog. Review workspace, backup, matched and difference counts.
4. For differences, note the relative path and category before closing the dialog.
5. Open both locations to resolve the relevant files, then run the check again.
| Result detail | Meaning and next action |
|---|---|
| MISSING FROM BACKUP | A discovered workspace media file has no corresponding backup; locate the source and restore the needed copy |
| EXTRA IN BACKUP | A discovered backup file has no corresponding workspace file; check whether it is an intentional retained copy |
| SIZE DIFFERS | The two files have different lengths; inspect both versions |
| CONTENT DIFFERS | Content comparison disagrees; keep both versions until the correct one is established |
| READ ERROR | The file could not be compared; restore access and check again |
The comparison uses relative paths, size and SHA-256 content checks for the supported media it discovers. Video Backup includes both video and audio. Sidecars and other non-media files are outside this check. A Backups match result describes the files covered by that run; it is not proof that every source-card file was scanned, imported or verified. Confirm expected counts and separately inspect any additional material you need to preserve.
This command reports differences. It does not provide an automatic repair or deletion operation.
15. Create proxies and request Smart Edit
The VIDEOBOT CONNECT area contains Create proxy and Create Smart Edit. Before copying, Hootio checks that the installed VideoBot can accept the selected workflow and access its workspace. Open VideoBot, sign in there, and update it if the prompt asks; a failed readiness check leaves the import unstarted. After copying and any selected Lightroom tasks, Hootio sends the video requests through the task queue. The top Open VideoBot button opens an installed copy; when it is not found, the interface offers Get VideoBot.
To enable proxies, check Create proxy. In Proxy Settings, choose the following, then click Save & Enable:
| Setting | Choices |
|---|---|
| Format | Automatic (Recommended), H.264 (MP4), Apple ProRes Proxy (MOV), DNxHR LB (MOV) |
| Resolution | 540p, 720p, 1080p, half, quarter, eighth, or original size |
| Storage location | Premiere Pro default proxy location or DaVinci Resolve default proxy location |
Cancel leaves proxy creation disabled for that selection. Uncheck the option to turn it off for future imports. Create Smart Edit is a separate checkbox; both can be enabled and their saved selections can remain active for later runs.
Follow-up requests use video destination folders with copied or existing video results. A photo-only or audio-only run does not produce a video workflow. When both options are selected, proxy requests precede Smart Edit requests within each destination folder; inspect completion in VideoBot rather than assuming the import progress tracks those jobs. For this Hootio-to-VideoBot workflow, the finish line is Done. plus All preprocessing stages are complete. in VideoBot; a Hootio Sent to VideoBot status is the handoff only.
If the application says that copying completed but the follow-up workflow could not start, open the imported destination and VideoBot to continue there. Import completion is separate from proxy rendering and VideoBot preprocessing completion.
16. Troubleshooting and the final handover check
| Symptom | What to check |
|---|---|
| SMART IMPORT is unavailable | Both workspaces must be configured, at least one device selected, and no other operation active |
| No removable storage found | Confirm operating-system access, reconnect the reader, and click FIND CARD |
| No supported media found | Inspect the card directly; check extensions, folder access and whether expected files are in supported categories |
| Destination is missing | Reconnect its drive or choose the intended replacement; confirm the saved path before retrying |
| Network target needs attention | Open it in Explorer/Finder, complete network sign-in and select RETRY |
| Not enough free space | Check the named destination, required and available space; free space or choose another location |
| Files appear under an unexpected day | Compare camera dates, file modification times, timezone context and the 05:00 rule |
| Existing count seems too high | Compare source and destination inventories; check same-name, same-size files independently |
Unexpected _001 copies | Inspect filename conflicts and previous renamed copies before repeating the run |
| Backup check says match but expected files are absent | Compare expected counts and paths; inspect source files and related files outside the check's scope |
| Lightroom or PhotoBot is waiting | Check for a visible catalog picker or backup dialog, confirm PhotoBot's plugin is enabled, then retry the paused task; see sections 17-18 |
| Lightroom tasks are paused | Read the error and choose Retry and continue; use Resume previews if offered after an interruption |
| VideoBot does not start | Confirm installation and open the copied video folder in VideoBot; keep the import and follow-up outcomes separate |
Before reusing a card, confirm that every source device and expected media category is accounted for; review workspace, backup and related-file failures; check folder dates and collision filenames; open sample media; and complete the backup comparison plus any required independent source-to-copy checks. Keep any unresolved source files on the card until you have a verified copy.
17. Complete the Lightroom and PhotoBot setup
First-use settings that keep the workflow moving
Required for the complete photo workflow: Install and enable PhotoBot's HootioPhotoBot.lrplugin in Lightroom Classic before starting Smart Import with Smart Develop or previews. Hootio can copy cards and create a basic catalog without it, but PhotoBot cannot complete the adjustment and preview stages without a working plugin connection.
1. Install Lightroom Classic 12 or newer and open it once to complete its own first-run screens. Hootio checks the installed version and supported catalog format online before creating a catalog. The cloud-based Lightroom app is a different product.
2. In Lightroom Classic, open Edit → Preferences → General (Windows) or Lightroom Classic → Preferences → General (Mac). Under Import Options, turn off Show import dialog when a memory card is detected. This prevents Lightroom from taking over when you insert a card for Hootio. If Default Catalog is set to Prompt me when starting Lightroom, choose the catalog you intend to use or Load most recent catalog so unattended PhotoBot steps are not held at a catalog picker. Adobe's preference reference explains both controls.
3. Schedule catalog backups for a time when you can handle Lightroom's exit dialog. If one appears during this workflow, finish or deliberately skip that backup and return to the task. Adobe advises against setting catalog backups to Never; Smart Import's media backup does not replace a catalog backup. Adobe's catalog-backup guide.
4. In Hootio Workspace Settings, set both required workspaces, then choose Lightroom · import preset. Select an installed preset or browse to an .xmp file and click Save Settings. The preset is applied when Hootio creates a catalog; None keeps Lightroom's default adjustments. The no-preset warning can be continued intentionally. This is a Hootio setting, separate from Lightroom's automatic card-import preference.
5. For Smart Develop or Build previews, install PhotoBot and sign in to it. In PhotoBot, use Settings → Plugin setup if the setup guide is not already showing. In Lightroom Classic, use File → Plug-in Manager → Add to select the HootioPhotoBot.lrplugin folder PhotoBot shows, enable it, then return to PhotoBot and select Check again. An older loaded plugin may need a reload or Lightroom restart. Hootio itself does not ship or require the former Hootio Previews plugin. PhotoBot guide.
Select the cards and follow-up work
With several readers, select all intended cards together. With one reader, import in rounds using the same Photo Workspace, and enable Create / update catalog for the last relevant card. Hootio includes supported photos already in each affected destination date folder, including manually copied photos. If cards cover different shooting days, the last card might not revisit earlier date folders; check each date and rerun the corresponding card with catalog creation if needed.
In Workspace Settings → Lightroom Catalog, enable Create / update catalog. On the main window, PHOTOBOT CONNECT → Smart Develop opens PhotoBot adjustment choices: face exposure, face white balance and optional automatic leveling with their limits and targets. Build previews requires Smart Develop and produces Standard and Smart Previews for the adjusted catalog. Hootio checks PhotoBot installation and account readiness before copying when these options are selected; this does not confirm Lightroom has loaded the plugin, so complete PhotoBot's Check again first. PhotoBot processing may use a project credit; the application reports current account terms and readiness.
Close any destination catalog currently open in Lightroom before asking Hootio to update it. Hootio no longer launches and closes Lightroom as a pre-copy test. If a catalog is locked, close that catalog and retry its queue task. You may leave Lightroom closed before starting; PhotoBot opens it when export or previews need it. Keep the source and destination drives connected, and handle any Lightroom startup or exit dialog that still appears.
Find the result and finish in Lightroom
Hootio saves the base .lrcat in each photo date folder's Lightroom Catalog subfolder. Updates append missing photos to numbered v2, v3 and later catalogs, leaving earlier versions and edits intact. A catalog with no new photos can be Skipped. PhotoBot creates a separate adjusted sibling ending in -hootio.lrcat or a later numbered -hootio-v2.lrcat; it does not overwrite the Hootio catalog or original photos. Open the latest completed adjusted catalog when Smart Develop was selected. Check the new catalog, accompanying .lrcat-data, photo links, representative adjustments and both preview counts before continuing the creative edit.
Smart Import and catalog creation are free. PhotoBot's adjustment and preview entitlement is separate; check PhotoBot's account screen for the current trial, plan and project allowance. If Hootio asks for a sample to assess an unsupported Classic catalog, submission is optional. Close Lightroom, select a recent .lrcat, read the privacy notice and consent before upload. Sending a sample requests review; it does not immediately enable that version.
18. Follow the task queue and recover safely
The Task queue runs in order for each affected folder: create or update the Lightroom catalog, run PhotoBot Smart Develop with previews when selected, then send VideoBot requests. Processed 1 / 4 counts ended tasks, not photos. Sent to VideoBot confirms handoff, not completed editing.
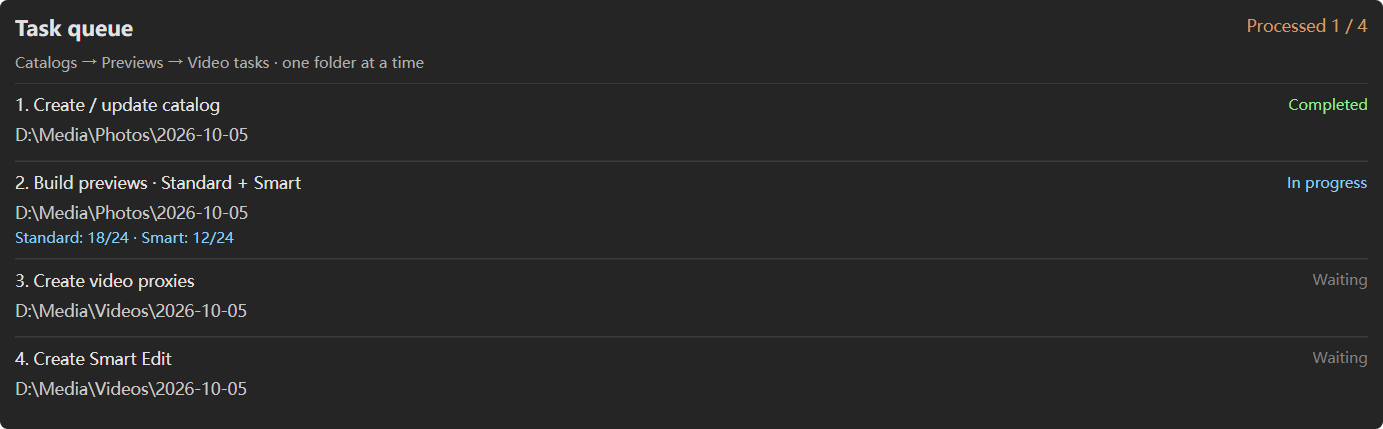
| Status | Action |
|---|---|
| Waiting | Finish or recover the earlier task first |
| In progress | Keep Hootio, Lightroom and PhotoBot available as requested; do not eject drives |
| Completed | Open and inspect the produced catalog or media; for previews check both counts |
| Skipped | Read the reason; an unchanged catalog keeps its previous versions |
| Failed / Cancelled | Read the error, correct it, then choose Retry and continue when offered |
| Sent to VideoBot | Open VideoBot and check its project, queue and actual output |
PhotoBot uses the installed Lightroom plugin to export analysis images and build Standard and Smart Previews on the adjusted catalog. A missing or inactive plugin, a Lightroom catalog picker, a closed Lightroom process, or an open adjusted catalog can interrupt this phase. Restore the plugin connection, respond to the visible dialog, and retry. PhotoBot keeps a checkpoint for unfinished jobs; use its Unfinished jobs… → Resume selected job when the PhotoBot window offers that recovery. On older Hootio queues, Interrupted Lightroom previews → Resume previews may be offered without reimporting the card.
STOP preserves copies already made and requests a stop to current Hootio work. It cannot recall tasks already accepted by VideoBot. A paused PhotoBot task can leave VideoBot requests waiting. Before reusing a card, check the import and backup results, the required catalog or adjusted copy, preview counts if selected, and VideoBot's separate completion state.
19. Check your Hootio version and install updates
Open Workspace Settings and read the Hootio version below Save Settings. Include this version and the exact error message when asking for help. It is independent of the PhotoBot plugin and VideoBot versions.
Hootio checks for a new release on the first startup of each local calendar day, including before sign-in. When A new Hootio is available appears, choose Update to download it, or Not now to continue using your current version. An offline check leaves the application usable and is retried on a later day's first startup.
During download, check the percentage. Cancel download cancels that download. If it fails, restore the connection and choose Update to retry. After verification, choose Open download folder, finish your current import, close Hootio, then run the downloaded installer. Downloading does not install the update automatically.
For manual installation, use the current Hootio downloads page and choose the package for your operating system and processor. If a corrected installer has the same version as the one you already use, install it manually: the automatic prompt offers higher version numbers.